The process of forming a strip of steel into a cylinder to be eventually welded closed can be a quality challenge: with so much tensile force pulling on the tube as it moves through the mill, stresses can appear in the material in various forms. One type of defect that can occur if either side of the seam has different tensile stresses is buckling. Buckling occurs once the strip has been formed into a cylinder and one side has a type of slow waviness to it, while the other side could appear flat and smooth. Once welded, the resulting weld bead can contain a periodic pattern of defects on the weld. This appears as a sinusoidal mismatch measurement that is often interpreted incorrectly as a mismatch defect.
The cause of buckling defects could be either:
- A cracked fin pass tool (the last set of rollers used to guide the tube into the weld box; these rollers have a small fin on them that fits between the edges of the parent material as it comes together). A crack on the fin could lead to some deformation of the strip edge as the tube faces come together prior to welding; or
- A problem with the first breakdown rollers (the first rollers used to start the forming process from a flat strip of material) that alters the shape or thickness of the material at its edges.
A Real World Example
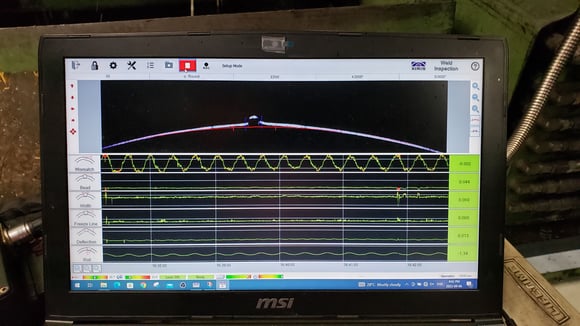
Xiris was recently working with a customer who had a tube mill where one side of the steel strip would come together after rolling with a slight mismatch compared to the other side. The mismatch defect would increase and decrease over time as the buckling of the parent material would also increase and decrease. Over the course of a complete cycle of sinusoidal buckling, the mismatch observed from one side to the other would also vary in a sinusoidal manner.
 A Buckling Tube with Sinusoidal Mismatch Observed
But how could the customer detect it? Manual, periodic measurements of the Mismatch would have only limited effectiveness because effective measurement depends on where and when in the buckling cycle that the operator is making their measurements. So, the mismatch condition may or may not be detected, possibly causing a complete miss of the buckling condition.
A laser triangulation system such as the Xiris WI-3000, with sampling rates over 100 Hz, is more than enough to catch any mismatch defects resulting from buckling.
When the WI-3000 system was installed on the line, a sinusoidal mismatch measurement could be observed. It was determined that the pass from the first breakdown rollers was incorrect, causing the edges to be incorrectly formed. This was a result of a mill set-up error made after a product changeover: the operating personnel missed changing out the first breakdown rollers to the correct rollers. This caused an incorrect breakdown pass form which resulted in the buckling of the strip edge.
Buckling defects can be a significant challenge in the process of forming steel into a cylinder leading to periodic pattern defects on welds and compromising the quality of the final product. It is crucial to address the root cause of the buckling defects, which could be a cracked fin pass tool or an issue with the first breakdown rollers. While manual measurement may have limited effectiveness, a laser triangulation system such as the Xiris WI-3000 can effectively detect any mismatch defects resulting from buckling.
Investing in advanced technology and equipment can lead to improved quality control and ultimately save time and money in the long run.
So, if you are a tube mill operator experiencing similar issues, consider implementing laser triangulation systems like the WI-3000 to ensure high-quality products and avoid production losses. To learn more about how you can implement Xiris inspection systems, reach out to our product experts.
Stay up to date by following us on social media or subscribe to our blog!


.png)
