Welding is a high-risk job, one slip-up can lead to rework, defects, wasted time, and lost money. Imagine having a clear, front-row view of the otherwise blinding process, allowing you to identify defects before they even form. How can you turn your every weld job into a masterpiece? Industrial weld cameras hand you that power and much more.
This guide goes beyond the rules of a weld camera setup, it gives you the control and knowledge needed to achieve consistent welds and reduce downtime.

|

Figure 1. XVC-1000 camera mounted in a protective housing using a mounting arm
Source: Xiris Automation
Right Weld Camera: Your First Step to Effective Weld Monitoring
Weld camera setup goes beyond just getting an image, it enables you to capture quality data, master process control, and achieve precise precision parameters. A top-tier monitoring system should provide a clear view of the arc, the dynamic melt pool, and the surrounding regions. Knowing your requirements is the first step to selecting the right camera.
- Determine the Purpose: Will you use the weld camera for live monitoring, detailed inspection, training, or a combination? Different weld cameras handle different jobs. Real-time monitoring demands an appropriate frame rate, slower processes like melt pool size can be captured at <60 fps, but high-speed events like droplet transfer in GMAW require a much faster frame. Whereas high resolution is the deciding factor for detailed inspection.
- Key Camera Specifications: Invest in a camera with the right specs with frame rate, resolution, optics, and HDR as your allies.
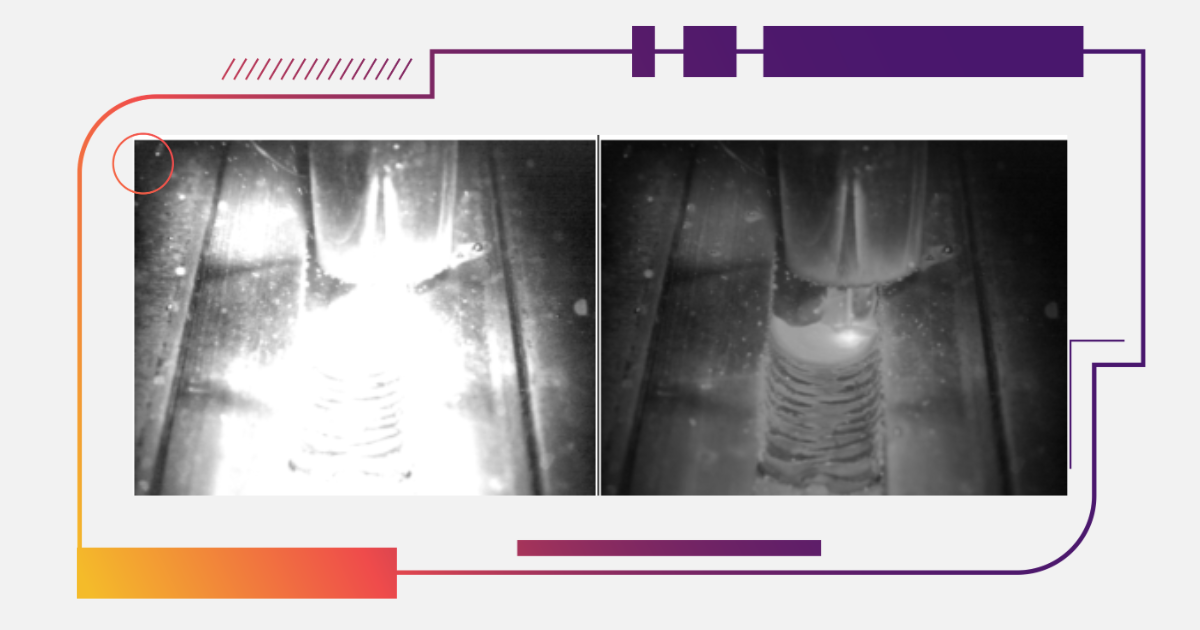
- High Dynamic Range (HDR): In welding, the bright arc and the dark surrounding region create an extreme contrast. HDR technology captures the unseen details. Cameras like the XVC-700/710 or the XVC-1000 (>140dB HDR), and XVC-310 (>120dB HDR) deliver exceptional clarity for weld monitoring.
- Resolution and Frame Rate: Camera resolution captures image details, while frame rate dictates motion display. The XVC-S100 camera offers a 1920 × 1080-pixel resolution for those crisp welding images, and the tiny-camera XVC-310 captures action at up to 40 fps. Cameras like XVC-1000 and XVC-1000e ramp it up to 55 fps, ensuring you don’t miss a thing.
- Lens Options: Interchangeable lenses allow you to adjust working distances and fields of view for diverse setups.
Want to dive deeper? Check out our checklist on Selecting a Weld Camera for choosing the right model for your process, application, and environment.
- Recommended Camera Models:
- For Versatile Applications: The XVC-700/710 and XVC-1000/1100 kits are your all-in-one solution for processes like GTAW, GMAW, and laser welding. Designed with robust features and accessories, they’re ideal for R&D, training, and high-power production.
- For Confined Spaces: When space is a factor, the XVC-310 camera’s compact "lipstick" design is ideal for narrow gap and orbital welding. Every millimeter counts and the XVC-310 camera delivers.
- For Specialized Needs: The XVC-S100 camera, with integrated LED illumination, prioritizes operator safety and process control in Submerged Arc Welding (SAW). The XVC-750 (NIR) camera offers unparalleled insight into melt pool dynamics in GMAW/GTAW, and the XIR-1800 (SWIR) camera is purpose-built to monitor thermal signatures in welding processes like laser cladding.
Prepare your Welding Environment
Welding environments are filled with extreme heat, humidity, dust, smoke, and fumes. Xiris weld cameras are rated IP65 for dust and water resistance, however, to protect your investment, consider cooling systems, protective housings, and regular maintenance. Don't let the harsh environment sabotage your welds and your equipment.
Camera placement is critical. Choose a location that gives you a clear, unobstructed view of the weld zone. Xiris weld cameras can be paired with a multi-jointed arm for precise positioning. The XVC-1000/1100 kit includes an extended mounting kit with a clamp for rock-solid stability. The XVC-S100 camera’s isolation plate provides flexible mounting options to suit your specific setup.
 Figure 2. XVC-1000e Camera on a mounting arm
Keep your camera accessible for easy adjustments, cleaning, and maintenance.
Camera Set up: Mount, Plug and Play
Setting up your weld camera doesn't have to be a headache. Follow this process to get clear images, and record valuable data, fast:
- Placement: All Xiris weld cameras are equipped with carefully designed optics and mounting considerations to minimize vibrations and maximize stability. Know your requirements, whether it's a close-up of the melt pool or a broader view of the welding process. Choosing the right camera angle and placement is the key to capturing what matters most:
- Steeper Angle provides a better view of the workpiece and weld bead, ideal for inspecting the finished welds.
- Shallower Angle provides a wider view of the weld head used for live process monitoring.
- Depth of Focus, especially at shallow angles, ensures key features are in sharp focus and centered in your Field of View (FoV).
- Front View: As per a general rule, a FoV about 4 times the weld bead width offers a good balance of detail and context.
- Side or Rear View: factor in the distance to the weld piece. Ideally, the view should include: the molten weld bead, the torch tip with arc, and a portion of the parent material, including the unwelded seam.
- Cable Management: To maintain reliable data and a safe workspace, connect cables correctly, following your camera model and setup instructions. Re-route any cables that might obstruct your view or create a trip hazard.
- Power Supply: Provide a stable, continuous power source. Xiris weld cameras support standard power connections with international compatibility. Power can be supplied directly (XVC-1000e), via PoE (XVC-700, XVC-1000, or XIR-1800), or a controller (XVC-310 or XVC-S100).
- Software Installation: Install the necessary software (e.g., Xiris WeldStudio™ or WeldStudioPro) and configure software settings for camera control, recording, playback, image analysis, and data logging.
 Figure 3. XVC-1000 Camera on a mounting plate with integrated LED illumination, installed on an automated welding system
Take control of your weld visuals by adjusting focus, working distance, and other optical settings. While cameras like the XVC-1000 feature field-adjustable focus lenses, others such as the XVC-750 and XVC-S100 cameras use fixed-focus lenses typically adjusted by physically moving the camera forward or backward.
Key settings to start with:
- Camera Control: Adjust exposure and gain for the right brightness and contrast, control focus and light intensity, use HDR features to balance bright arcs with darker backgrounds, define your area of interest, and set the frame rate to match the speed of your welding process (higher for fast processes).
- Image Settings: Fine-tune tone mapping levels, display orientation, image processing, magnifier, and color balance.
- Recording: Customize labeling, video quality, and file format options.
Tip: Make process-specific tweaks based on your welding method (GMAW, GTAW, SMAW, etc.) and welding automation setup. Run test welds under typical conditions, then review and adjust settings to achieve optimal image quality. Prioritize capturing critical features: melt pool, arc, weld bead, and tungsten tip.

Figure 4. Two XVC-1000 cameras mounted on an extended mounting plate with LED illumination
Weld Camera Accessories: Get the Most from Your System
Maximize your Xiris weld camera's potential with essential accessories:
- Trigger Kit: Synchronize your camera with the welding power supply to capture stable images, minimize flashing, and measure key parameters of welding processes (GMAW, WAAM, CMT).
- Illumination Kits: Improve visibility during setup, welding, and inspection with a high-power LED illumination like the XL-30. Cameras like the XVC-700 have a specialized LED illumination assembly for initial setup and post-weld inspection.
- Cooling Housings: Offers additional protection and cooling, with easy-to-replace protection windows.
Weld Camera Maintenance and Troubleshooting
Keep the camera lens and housing clean to avoid image distortion. Regularly inspect cables, connectors, and mounts for any signs of wear or damage. Stay updated with the latest software and firmware.
- Experiencing blurry images? Try adjusting the focus.
- Have lighting issues? Tweak exposure and HDR settings.
- Suspect a signal loss? Check connections and cables.
- Camera overheating? Provide proper cooling.
Still, facing an issue? Contact Xiris.
Transform your welding experience with advanced weld camera technology. Contact our sales team today to discuss your specific needs and find the perfect solution for your application.

|