Recent advancements in machine vision technology have made a new type of inspection able to see defects related to the forming and welding area of a tube or pipe. The result is improved quality assurance and process control on the production line. The new type of inspection device is a laser-based triangulation system that measures the outside contour of a tube or pipe in the vicinity of its weld.
Typically NDT systems are placed at the end of a production as a final check. However, the laser inspection system can be placed directly after the weld box. This system can let operators know what is changing in their welding process, allowing them to perform corrective action before significant scrap occurs. This capacity is especially helpful for one of the most common defects found across all types of Tube manufacturing: Tube Scarf defects.
The Scarfing Width
In certain situations on ERW/HF tube and pipe production lines, there is not enough space to perform the Non Destructive Inspection (NDI) measurements right after the weld box because the scarf tool (used to remove excessive bead from the tube) is placed directly after the weld box. In such situations, the measurement process must be made after the scarfing tool, measuring the flat area of the tube where the scarf has occurred. On some production lines, this measurement is essential to identify the shape and profile of the tube, and to understand how it is travelling through its forming process.
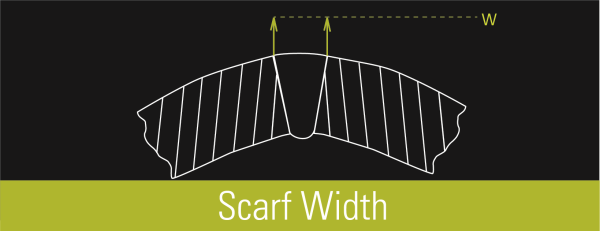
Known as the scarf width, this measurement is defined as the length of the “flat” portion of the tube that appears after the weld bead has been removed by scarfing. Scarf width measurement changes quickly during production, so it is best averaged over a number of inspections in order to make the measurement stable.
The Scarf Width, where “w” = the width of the defect.
How the WI-2000 System Measures the Scarf Width
Xiris Automation Inc. has developed a non-destructive inspection system called the WI-2000 Weld Inspection System. The WI-2000 includes a laser line and a camera whose optical axis is offset to the axis of the laser line by an “offset angle”. The WI-2000 creates a visible cross-section of the tube by projecting the laser line on to the tube and capturing an image of the line using the welding camera. The resulting image shows a profile of the tube surface as if it were cut in cross section. If a tube is ideally round, the laser image will represent a section of an ellipse and any anomaly such as a freeze line defect can be mathematically detected.
The WI-2000 bases all of its measurements on the differences between the actual laser profile line seen by the camera, and the ideal mathematical profile based on the tube parameters. By knowing the position of the actual laser profile, the ideal profile, and the size of the pixels in the image, the WI-2000 can detect weld bead profile defects that often escape detection by other quality tools such as Eddy Current testing, or Ultrasonic Testing techniques
Conclusion
Overall, laser-based 3D imaging systems, such as the WI-2000 from Xiris, offer an excellent measurement option for tube mill owners/operators who want additional, real-time monitoring of weld features. They can be used in a proactive manner, warning operators what is changing in their welding process so that they can perform corrective action before significant scrap occurs And by measuring the outside contour of a weld, laser-based 3D imaging systems can operate on any type of material, regardless of its reflectance or magnetic properties, using a single head to perform the measurement.
To learn more about Xiris weld inspections systems, request a consultation with one of our experts.
Stay up to date by following us on social media or subscribe to our blog!


